Primary Gateway
Before you complete these steps, import and verify your domains on the Configuration page as described in User Added Domains
To use Secure Email Threat Defense as a primary gateway, you need to set up your mail host to send traffic to Secure Email Threat Defense. This involves changing your DNS MX record. The steps will vary depending on your provider.
Configure Incoming Message Traffic
-
To allow Secure Email Threat Defense to receive incoming email on behalf of your domain, update your DNS MX record to point to your Secure Email Threat Defense environment. The destination depends on where your Secure Email Threat Defense instance is hosted.
Table 1. DNS MX Record Settings by Region
| Environment | DNS Record |
|---|---|
| North America | mx.us.etd.cisco.com |
| Europe | mx.eu.etd.cisco.com |
| India | mx.in.etd.cisco.com |
| Australia | mx.au.etd.cisco.com |
| United Arab Emirates | mx.ae.etd.cisco.com |
| Beta | mx.beta.etd.cisco.com |
| Government | mx.usgov.etd.cisco |
-
Configure your domain to enable Secure Email Threat Defense to deliver incoming email to your mailboxes. Configure your mail server to accept messages from the IP addresses listed in the table below. The IP addresses differ depending on your region. You can retrieve the an updated list of IPs using the corresponding host name.
Example: dig host.<region>.etd.cisco.com retrieves the corresponding IPs for the region.
Table 2. Regional Host Names and IPs
| Region/Environment | Host Name | IPs |
|---|---|---|
| North America | host.us.etd.cisco.com |
3.41.135.128 3.41.135.129 3.41.135.130 3.41.135.131 3.41.135.132 3.41.135.133 3.41.135.134 3.41.135.135 3.41.135.136 3.41.135.137 3.41.135.138 3.41.135.140 3.41.135.142 3.41.135.143 3.41.135.148 3.41.135.151 |
| Europe | host.eu.etd.cisco.com |
18.96.45.104 18.96.45.100 18.96.45.102 18.96.45.96 18.96.45.99 18.96.45.103 18.96.45.97 18.96.45.107 18.96.45.98 18.96.45.101 18.96.45.106 18.96.45.105 |
| India | host.in.etd.cisco.com |
18.96.227.160 18.96.227.161 18.96.227.162 18.96.227.163 18.96.227.164 18.96.227.165 18.96.227.166 18.96.227.167 18.96.227.168 18.96.227.169 18.96.227.170 18.96.227.171 |
| Australia | host.au.etd.cisco.com |
3.44.64.89 3.44.64.90 3.44.64.83 3.44.64.80 3.44.64.82 3.44.64.84 3.44.64.85 3.44.64.88 3.44.64.86 3.44.64.87 3.44.64.91 3.44.64.81 |
| United Arab Emirates | host.ae.etd.cisco.com |
18.96.96.48 18.96.96.49 18.96.96.50 18.96.96.51 18.96.96.52 18.96.96.53 18.96.96.54 18.96.96.55 18.96.96.56 18.96.96.57 18.96.96.58 18.96.96.59 |
| Beta | host.beta.etd.cisco.com |
3.41.135.144 3.41.135.147 3.41.135.146 3.41.135.150 3.41.135.149 3.41.135.145 3.41.135.139 3.41.135.141 |
| Government | host.usgov.etd.cisco |
195.146.171.50 195.146.171.51 195.146.171.100 195.146.171.101 195.146.171.150 195.146.171.151 |
-
In Secure Email Threat Defense, go to Configuration > Analysis configuration > Domains > Imported Domains and click Update List. Verify that the expected domains are imported and can accept traffic.
Configure Outgoing Message Traffic
For Gateway Mode (formerly Inline/SMTP message sources), Outgoing messages can be analyzed and then dropped if found to be Threats. Configuration options are accessible from Configuration > Mail flow configuration.
The Host name to send traffic to for your region is indicated in the panel, and are listed below.
Table 3. Regional Outgoing Host Names
| Region/Environment | Host Name |
|---|---|
| North America | out.us.etd.cisco.com |
| Europe | out.eu.etd.cisco.com |
| India | out.in.etd.cisco.com |
| Australia | out.au.etd.cisco.com |
| United Arab Emirates | out.ae.etd.cisco.com |
| Beta | out.beta.etd.cisco.com |
| Government | out.usgov.etd.cisco |
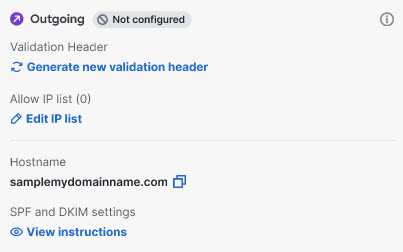
At least one type of security validation must be enabled for outgoing mail: Validation Header or Allow IP list. If both are configured, at least one is required to pass for the mail to be sent. If all configured validations fail, the outgoing mail will be rejected.
Adding a Validation Header
To add a validation header:
-
Go to Configuration > Mail flow configuration > Message traffic.
-
In the Message source Outgoing section, Click Generate new validation header to generate a header. The header will take the form header: value.
-
Copy the validation header secret and create a mail flow rule from your outgoing mail source to add the generated X-CSE-ETD-OUTBOUND-AUTH header for all outgoing email sent to Secure Email Threat Defense.
-
Return to Secure Email Threat Defense and click Enable Validation to enable the validation header.
Rotating a Validation Header
Click the rotation icon to generate a new validation header for outgoing messages. The existing header will remain valid for 30 minutes, allowing time to update your systems. Messages without a valid header could be rejected; ensure your systems are updated within 30 minutes.
Adding an Allow IP List
Add the list of IP addresses you will use to send outgoing traffic from your domain to Secure Email Threat Defense. Updates to your list may take several minutes to take effect.
-
Go to Configuration > Mail flow configuration > Message traffic.
-
In the Message source Outgoing section, click Edit IP List.
-
Click the Manage IP List button. Add your list of IP addresses from which you will send outgoing traffic to Secure Email Threat Defense.
-
Click Save.
SPF and DKIM Signing
SPF and DKIM Signing instructions are shown in the Secure Email Threat Defense UI. These guidelines help you create domain-level DKIM signing keys and configure necessary DNS records. Update the DNS record for each domain you want to enable outbound mail analysis for, using the formats shown when you click View Instructions.
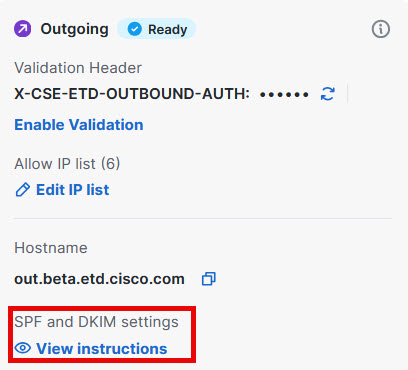
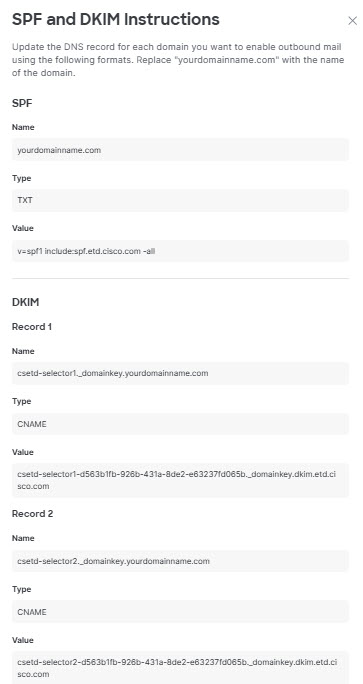
Table 4. TXT Record Settings by Region
| Region/Environment | TXT Record |
|---|---|
| North America | v=spf1 include:spf.us.etd.cisco.com -all
|
| Europe | v=spf1 include:spf.eu.etd.cisco.com -all
|
| India | v=spf1 include:spf.in.etd.cisco.com -all
|
| Australia | v=spf1 include:spf.au.etd.cisco.com -all
|
| United Arab Emirates | v=spf1 include:spf.ae.etd.cisco.com -all
|
| Beta | v=spf1 include:spf.beta.etd.cisco.com -all
|
| Government | v=spf1 include:spf.usgov.etd.cisco -all
|